Primary natural science

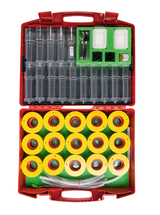
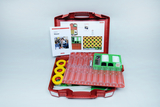
Students kit Water purification


Water is vital to our lives and those of animals and plants. The kits Water purification and Water supply help children to understand the cycles of water.
They will learn where the water comes from, how it is distributed, utilized and finally rinsed away to be treated and put back into the cycle. They will recognize the importance of water for life and learn how to save water as a resource.
 
Examples of experiments:

  • Which forms of soil allow water to pass through and which don’t
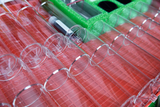
  • Discovering that sand and gravel filter beds trap solids in the water, while dissolved substances (like oil, salt or detergent) cannot be removed from water by filtering
  • The effect of polluted water on germinating plants
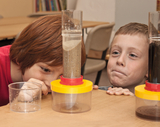
  • The stages of mechanical cleansing of water
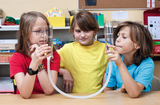
  • Discovering the principle of linked water vessels and determining applications for it

 
Teacher’s manual ‘Experiments in workstations: Water purification’
With copy templates covering 24 workstations.
 
Age 9-10
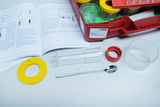
Materials for up to 24 workstations (for 24 children at least)

The picture shows a red storage box containing various experimental materials. On top there are many transparent beakers, spoons and a chemical bottle, while the lower part is equipped with yellow and red equipment and tubes.
The picture shows a fold-out red set of experiment materials on the topic of water. It contains various containers, tubes, a manual and other utensils that can be used for practical experiments in educational settings.
The picture shows a red experiment kit from Cornelsen, which is designed for educational purposes in the field of water analysis. The set is called "Water 1" and contains materials for examining drinking water and wastewater.
In the picture, children in a classroom are experimenting with different materials in clear containers. They add water to the containers and observe the results, with their curiosity and cooperation clearly visible.
The picture shows children experimenting with different containers in a classroom. They appear to be conducting an experiment in which they layer different materials into transparent cylinders and observe them.
The picture shows two children looking fascinated at an experiment kit that appears to show different layers of materials. The kit consists of transparent containers containing differently colored substances and
The picture shows three children holding two glass flasks filled with water, connected by a tube. They are experimenting and probably observing a physical phenomenon, while a friendly learning atmosphere
In the picture, three children are experimenting with water in glass containers and a hose. They seem to be watching with interest how the water in the containers acts, which promotes interactive learning.
The picture shows a student set for experimenting with water, presented by Cornelsen Experimenta. In the foreground you can see children carrying out various experiments together, demonstrating curiosity and teamwork.
The picture shows an arrangement of transparent test tubes on a red holder, which are used for experimental purposes in the educational sector. In the upper area, other materials and accessories are also visible in a green insert.
The picture shows a collection of transparent containers with yellow lids and red inserts. The containers are arranged symmetrically and stand on a green base, which gives a fresh, three-dimensional impression.
The picture shows an arrangement of test tubes in a red holder and a green set of laboratory equipment, including pipettes and plates. In the foreground is a container with a label for chemicals.
The picture shows instructions on the topic "Rainwater becomes groundwater" with a schematic representation of the water cycle. The steps described explain how invisible water drops evaporate and turn into clouds and finally into rain
The picture shows instructions from an experiment booklet entitled “Station A3: Drilling deep into the earth”. It lists materials such as filter tubes and various fillers that are needed for the experiment.
The picture shows instructions for a soil type test experiment that requires materials such as a built-up filter, plastic cups and spoons. It is part of a teaching material for understanding water and soil in the German education system.
The picture shows an experiment set with various tools, including a transparent tube, a corresponding container and a spoon. There is also a manual that contains instructions for conducting experiments.

item number 31802

Share product on:        

Technical specifications

Size of kit: 540 x 450 x 150 mm

With this experiment, children learn how and where groundwater forms.


In the following four experiments, the children recognize that only the clay/loam holds back the water, while the other types of soil let it through and store it. The different rate at which the water seeps away depending on the type of soil is an additional observation.


The children realize that the rainwater ends up being clean, although it should be "dirty" because of the soil it flows through. However, they also recognize that this filtering process does not work with substances that humans bring in, e.g. B. salt, oil, detergent and paint. Students can later conclude that groundwater needs to be protected from such contaminants.


In connection with the formation of groundwater, the formation of rain is also of interest, because this is the only way to close the cycle. All attempts to do this in elementary school have the disadvantage that they only partially represent the processes in a model-like manner and require patience.


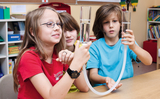
With this experiment, which requires a little handicraft work, children can get an idea of ​​how a fountain is built and how it works in principle.


The children get an idea of ​​how the pressure has to be generated with which the drinking water itself reaches the taps in high-rise buildings. One option is to use pumps that have to run constantly. The second option is to first pump the water into a container that is higher than the taps.


Children who have engaged in this experiment should understand why the materials mentioned (and others) must be kept out of the wastewater. Even with our “clean” materials, it is not a pleasant task to have to separate them from the water.


We use edible oil because in reality, like all other edible fat residues, it is removed during washing, but is not eliminated as such and therefore has a share in the sewage treatment plant work. The same goes for the toilet paper. As a result, disposal after the experiment is also easy: it can be done with the waste water.


  • 1 × Plastic case ca.540x450x150 mm
  • 1 × Tray 510x360x20 mm
  • 1 × Storing diagram,int.vers.
  • 1 × Foam insert for 31802
  • 1 × Lidfoam grey,515x355x10mm
  • 15 × Plastic dish 95x62x20 mm
  • 1 × Connecting tube, 650x14 mmØ
  • 7 × Connecting tubing, 300x14 mmØ
  • 2 × Metal spoon, 220 mm
  • 15 × Metal spoon, 138 mm
  • 1 × Plastic box 140/50/35 mm
  • 15 × Beaker, plastic 125 ml, graduated
  • 15 × Beaker, plastic 250 ml, graduated
  • 15 × Coarse sieve
  • 15 × Copper wire gauze
  • 15 × Filter tube, transparent
  • 15 × Push-on connector, rod
  • 15 × Plastic pot (old No.:90413)
  • 1 × Colouring agent, blue
  • 15 ×